
Libby
with 4imprint
12 years
Artwork Tips
Our art team is always willing to work with you to make sure your artwork looks amazing on whatever item you choose. Explore this page to learn more about your artwork and how our process works.
Navigate The Art Tips Page
How to Send your Artwork
Digital Files
After you have placed your order, an option is provided to immediately upload your art files. If you don't have your art files at that time, you can also reply to the confirmation e-mail you receive and attach your art file to the e-mail, or use the link provided in the e-mail to upload them. This ensures that we can match your artwork to the specific order you've placed.
Hard Copies
After you have placed your order, our fax number will appear on the order confirmation screen - just be sure to refer to your order number.
Forgot To Send Your File
Do not worry. Simply wait for one of our Customer Care Representatives to contact you promptly after your order is placed & email your files at that point.
Send Special Instructions
There is a box for special instructions on the delivery page. Feel free to give us any information you think we need. Remember, artwork preparation is FREE and you'll receive a digital or faxed (your choice!) mockup for your approval - FREE - prior to production.
Accepted File Types
We can accept anything: e-mailed art, faxed art, or mailed hard copy. Just send us what you have and we'll work with you on the rest. Keep in mind that to keep your order moving as fast as possible, we prefer to receive vector file formats.
Note: Changing the file name to a vector file extension will not change the file type.
Preferred Vector File Types:
PDF (Adobe Acrobat)
• Embed the fonts used or export as generic .eps
AI or EPS (Adobe Illustrator)
• Convert text to outlines, embed any linked images
CDR (Corel Draw)
• Convert text to curves
Other Accepted File Types:
DOC, PPT or PUB (Microsoft Office Files)
• Embed or include fonts
BITMAPS (.jpg, .tif, .pcx, .gif, .png, .bmp)
Imprint Types
Applique

Pieces of fabric are sewn into the item to form the imprint
Deboss
Imprint is depressed into the item's surface
Deep Etch

Imprint is sandblasted, creating a deep frosted look
Emboss
Imprint is raised onto the item's surface
Embroidery
Computerized sewing machines stitch the imprint onto item
Foil Stamp

Metallic foil resins are applied to the item's surface
Full Color

Imprint is printed in CMYK allowing for the use of photos
Heat Transfer

Heat is used to thermally bond imprint onto the item's surface
Laser Engraved
Imprint is etched into the item via a laser
Pad Print

Imprint is transferred to the item via an inked flexible pad
Satin Etched

With use of acid on glass, this gives the imprint a frosted look
Screenprint

Ink is pressed through a screen onto the item's surface
How to Convert Text to Outlines
If working in Illustrator or other graphic programs, you will want to convert your text to outlines prior to sending the file. This ensures that your font does not get substituted and we will be able to keep your artwork exactly as you submit it.
To do this, you will want to go up to the menus at the top of the Illustrator program. Click on “Type” and go down to “Create Outlines”. You may also select the artwork and press Ctrl + Shift + O. Save and send us the file.
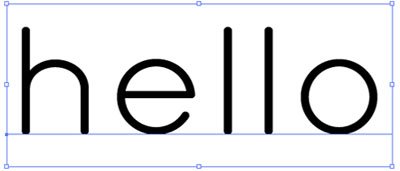
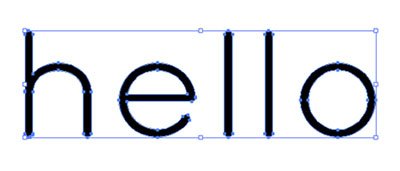
Raster vs Vector
Raster files are made up of pixels and are commonly called bitmaps.
Vector files use coordinates to create shapes with points and lines. This file type maintains high image quality at any size.

Full Color Artwork
Resolution
Your file must be at least 300dpi or vector art. If your image is below 300dpi, please do not simply increase the resolution. This will result in a very blurry, pixelated image. Ideal full color artwork will be 300dpi or higher at the size it will be printed.
Bleed
The bleed area runs along the edges of your document. You will want to extend any background image or color all the way to the edge, and slightly past it, to prevent any white borders from showing.
Web Images
When images are taken from a website, they are typically 72dpi. This resolution is not high enough for printing purposes. You may also run into copyright restrictions when using web images and therefore we do not recommend using these in your artwork. The only exception would be if the image was purchased from a stock photo website at a large resolution.